Task 124: Activity | Make an Omelet
Estimated Time: 30 mins
Perfect grade - 100%
Instructor Comments
Hi Leela,
Fantastic job on your omelet exercise. The simplest looking dishes are often deceptively steeped in technique and require practice. An omelet is the perfect example of that!
You got the outside of the omelet to set while the center looks creamy but not watery which is great. Nice shape and (lack of) color to the exterior of the final omelets, and well done mixing the eggs so there are no white streaks throughout.
You paid attention to all the details and were thorough in your explanations, which is appreciated.
Overall, you did a great job. Keep up the good work and keep pushing!
Cheers,
Sandy
Graded on March 31, 2021 by Sandy S
Score Breakdown: 4 out of 4 Points Mise en place 4 out of 4 Points In-process, step 14 out of 4 Points In-process, step 26 out of 6 Points Finished product
This is an opportunity to demonstrate your ability to properly prepare an omelet. We will ask that you submit 4 images that show your competency in, 1) mise en place, 2) stage one of the preparation of the omelet, 3) stage two of the preparation of the omelet, and 4) the presentation of two omelets to show form and doneness.
Please present two rolled omelets on a plate. Do not add internal ingredients to the omelets, including black pepper. One should be intact to show the rolled form and proper shape and the other should be cut to show the cross-section and degree of doneness. Please refer to the lesson on How to Make an Omelet.
For your final presentation photo, ensure that lighting is good! And, take a close-up shot! We need a good view of the interior of the omelet. Also, don’t garnish the finished items because this blocks the view of the surface of the omelets.
Link: How to Make Clarified Butter
Instructions: Prepare 2 Omelets
Notes:
Be sure to take well-lit, clear, and relatively close-up photographs that capture the details of your work and highlight the learning outcomes. We will provide guidelines on what to emphasize in your photos.
Remember that perfect scores are reserved for exemplary work and that even good work has room for improvement. Take the time to do your best work before you submit your assignment. And, note in advance that you may not appeal your grade for the purposes of redoing the assignment to get a better grade. Please take a moment to reflect on and learn from your experience and our feedback.
This activity is worth 18 points
Submit the following:
Photo 1: Mise en Place
Set out all your ingredients, measured and ready to use in your preparation.
Photo 2: In-Process, Step 1
Image/description of stirring and initial cooking
Detail your process, timing, temperatures, and sequencing for this assessment.
Photo 3: In-Process, Step 2
Image/description of the rolling process in the pan
Detail your process, timing, temperatures, and sequencing for this assessment.
Photo 4: Finished Product
Present 2 rolled omelets on a plate. 1 should be intact to show the rolled form/shape & the other should be cut to show the cross-section and the proper degree of doneness (not quite set in the center, w/ creamy texture).
Include a detailed description with a focus on taste, flavor, aroma, and texture.
Remember, good lighting, close-up photo and no garnish.
Activity | Image Upload: Make an Omelet
View other student photos: Photo 1 | Photo 2 | Photo 3 | Photo 4

THIS PHOTO IS PUBLIC
Photo 1: Mise en Place (4 pts)
By Leela N.
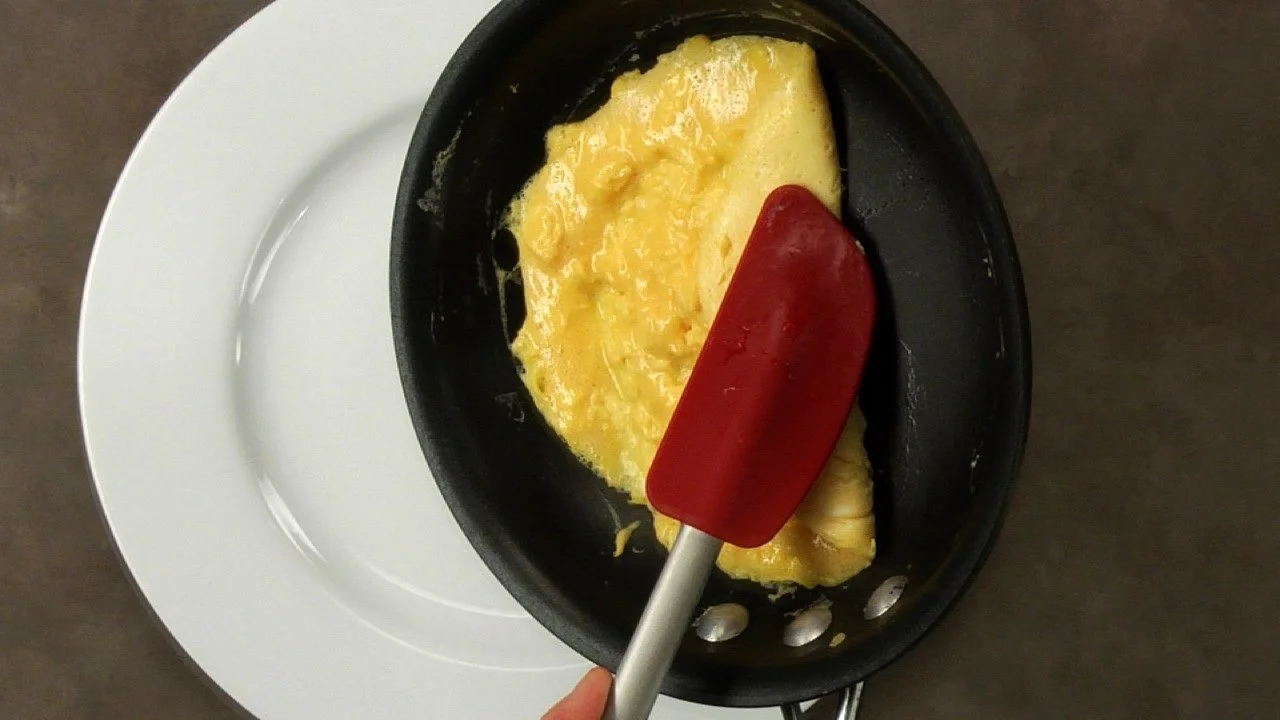
Stirring and Initial Cooking
I mixed the eggs with a fork until fully blended, and then added a pinch of salt and mixed to incorporate. I added about a tablespoon of unsalted butter to a pan over medium heat and, upon the butter melting and bubbling, added the eggs. I immediately use a spatula to scramble the eggs, using small circles, moving clockwise around the pan. I periodically also swept the edge of the pan to reincorporate egg that had splashed on the edge, quickening my pace slightly as the eggs began to set.
Once the egg had set enough that they did not quickly fill in as the spatula moved across the pan, I began to shake the pan while stirring to keep the eggs evenly distributed. Once the gaps were no longer filled by shaking, and the eggs were only slightly runny on their surface, I removed from the heat and evened the eggs with my spatula. After around 30 seconds when the eggs were set, but still very moist, I began to roll the omelette.

Photo 2: In-Process, Step 1 (4 pts)
By Leela N.
Rolling the Omelette
Once ready for rolling, I positioned the pan above the plate, and folded over the top third (parallel to the handle). I then ran my spatula around the edge of the omelette, and gave the pan a gentl…
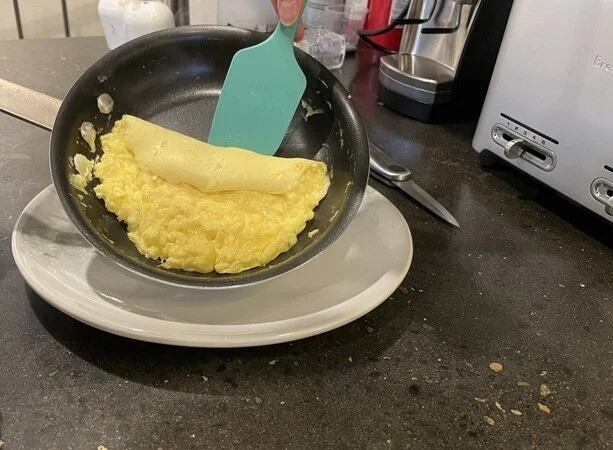
Once ready for rolling, I positioned the pan above the plate, and folded over the top third (parallel to the handle). I then ran my spatula around the edge of the omelette, and gave the pan a gentle shake to dislodge the omelette and to allow it to slide to the edge of the pan. I then slid the egg onto the plate, at the same time gently flipping the omelette onto itself (using the spatula to prevent the omelette from losing its shape). Finally, I used two spoons to gently shape the omelette into its final form.
Photo 3: In-Process, Step 2 (4 pts)
By Leela N.
Final Plate
The omelette had a mild egg aroma, with no discernible smell of butter or any browning. The texture was delicate, with an extremely soft (almost silky) outer layer, and moist overall texture, similar to a soufflé. It had a bit of a bounce to the touch. The taste was creamy and had a delicate mouthfeel.
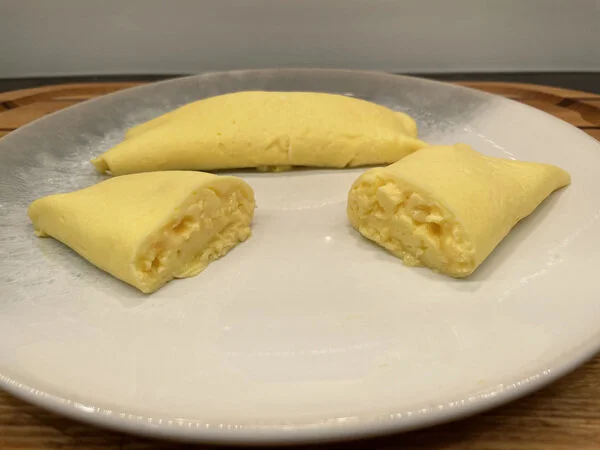
Photo 4: Finished Product (6 pts)
By Leela N.