
Food at Burning Man
We eat well during our Burn. Life is easy with an RV with a fridge and a microwave, but much of the advice below works well with a tent and a good stove.
What We Eat
Our Main Meals
We bring one solid meal for every night, and we are super lazy about it. The morning before driving to the playa we buy ten full dinners from our favorite Indian and Thai restaurants. All curries or other dishes of similar consistency. We then freeze the food as described below under Food Safety.
We also order a pizza, let it cool for around 90 minutes. With then divvy it up into snack sized servings and bag it in one gallon ziplock bags.
Finally, we round out our pre-prepared food with some breakfast items: three breakfast burritos per person, which can just be microwaved, or heated in a pan with an ajar lid under low heat.
Here’s our shopping list from 2018. We tend to eat quite a bit of food at BM, and all the perishable food was consumed by the day after we returned home - which means we had a buffer of 1.5 days of “extra” food for the playa. We consumed virtually none of the non-perishable food, but it would have sustained us for another few days in case of emergency (food spoilage, mechanical breakdown, or weather conditions preventing exit from BRC).
Random Snacks
We always bring some tortillas and cheese for easy quesadilla, a few cans of soup (which usually go uneaten), and a bunch of granola bars (which usually get eaten).
Pudding cups make for easy snacks and desserts.
Salted nuts make great backpack snacks for riding around the Playa, and provide needed electrolytes. They taste good in the heat and cold, so if you like nuts, especially smoked almonds at home, bring some to the desert.
Drinks
Coffee is an important part of my life. I fancy myself having a sophisticated palate, and all that crap. But for many years my experience of coffee in the dessert was an absolute failure. Making it in a pot in an RV is messy, especially if rushed or intoxicated. I tried freezing espresso in cubes and heating it up…. it worked OK, and it’s something you might want to try at home.
And I hate to put this into print, but at Burning Man I bring a Nespresso style coffee maker. It’s the only time of the year I use it since it’s expensive, environmentally uncool and makes so-so espresso. But my time on the playa is zero to espresso is around 2 minutes, with no stove use and no mess.
I also buy a lot of cans of iced espresso, my favorite is Rise Brewing Co.. I don’t do this crap at home. But at Burning Man, it’s a ritual and it works well for me.
Packing and Storing Food
Coolers
For two people in an RV you will want two large (70 qt) high quality coolers. We use Coleman Xtreme coolers, which we purchased used for around $30 each on Craigslist. These are the minimum quality that work for Burning Man. Better coolers are more expensive, but worth the money if tent camping; RVs are more forgiving, since you have a more temperature controlled environment and a fridge to help manage things. The best coolers are probably the Yeti Tundra 65 or the RTIC 65. The Yeti 65 runs around $200 used; the RTIC 65 is $250 new and about half that used but seldom pop up for sale. When buying used carefully check for any cracks or deformities to in cooler, and ensure the lid fits properly.
A few days before your departure wash and disinfect your cooler. Use soap and water on inside and out, followed by a disinfecting rinse of a cup of bleach to a gallon of water. Rinse with clean water and allow to dry with the lid open.
Preparing Your Food for Travel
It is vital that before packing your coolers, all food going into a cooler is completely frozen. Mixing unfrozen food with frozen food will only result in the unfrozen food warming up the frozen food and melting your ice, dramatically reducing the time your food will stay cold at BRC.
This technique minimizes the chance of bacterial growth, and maximizes how long food will stay frozen at BRC:
The week before your departure turn your freezer to its coldest setting.
A day or two before leaving for BRC cook or purchase all of your food for the week.
You are going to vacuum seal your food with a simple technique (watch this video). First, fill a cooler or a large sink with ice water. You will need a lot of ice for this.
Put each meal in its own 1 gallon freezer bag and zip it almost all the way closed. Leave a finger opening in one corner.
Submerge the gallon bag slowly in the ice bath, being careful not to allow water to enter the bag. Continue to right below the opening you’ve left in the bag, allowing all the air to escape from the top hole. Then seal for an air tight enclosure.
Allow the food bag to sit in the ice bath.
Repeat for all meals.
Keep adding ice and stirring the water bath for a good hour. The food bags should be completely ice-cold before taking them out.
Remove the ziplock bags and dry them off. Then put them in a second zip lock bag, with the zippers both facing the same direction.
Put the near frozen food in your freezer to finish freezing.
We use this technique for almost all our cooked food, but pizza is the exception.
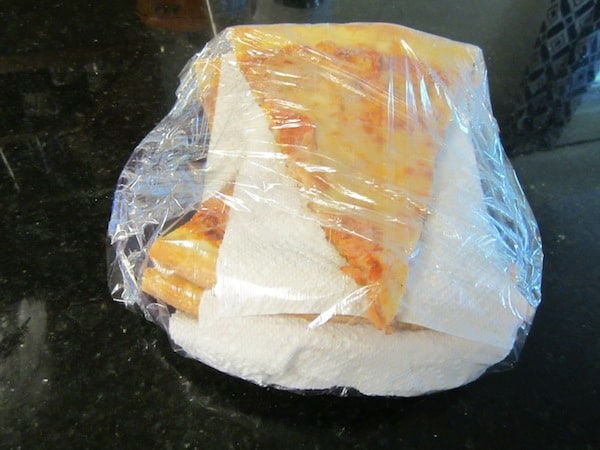
For pizza, we order from our local favorite and let it cool on the counter until the cheese sets up, which usually takes less than an hour. We then separate pieces on with paper towel and wrap in cling film, before putting it in a ziplock bag and freezing it using the techniques described above.
How to Keep it Cold: Cooler Techniques
The last thing you do before getting on the road to BRC is to pack the RV fridge and coolers.
We start with at least two coolers, regardless of how much food we are bringing, because we divide our food into “the first half” of the Burn and “the second half” of the Burn piles. The second half food goes into a cooler, which is firmly sealed and not opened until mid-week at Burning Man.
Both coolers are packed with very similar techniques:
The week before leaving freeze ice in freezer safe zip lock bags, using different sizes ranging from one quart to one gallon. We freeze them flat so each bag is only about 1 or 1.5 inches high when frozen. Double bag each one to avoid leaks.
At least three or four hours before departing for the playa (overnight works too) put some ice in the coolers to cool them down before loading food.
When everything else is packed in the RV remove the ice used to cool the coolers and discard it. We dry the coolers out as needed.
Line the bottom of the cooler with frozen ziplock bags, forming a 1 to 1.5 inch layer of ice on the bottom. This will help keep your food off the bottom and keep it out of any water that might accumulate there. The coolers should stay very dry using the zip lock bag technique, which is critical to avoid cross contamination via dirty water.
Add a layer of food, and then another layer of ice. You want approximately half of the volume of the cooler to be ice and half to be food.
Avoid air pockets around food. Use smaller ice baggies as needed to have the cooler packed as densely as possible. Avoid cubed ice, however, as the ice to volume ratio is low: there’s too much air in your cooler when you use cubed ice for BRC.
For your second half cooler, finish with a layer of ice. If you plan to use dry ice, add the layer of dry ice (wrapped in newspaper or other insulating material it came in), and then another layer of standard ice. This dry ice sandwich keeps the dry ice off your food and off the top and sides of the cooler. Dry ice is -109 degrees F, and can easily destroy a non-dry ice ready cooler if it touches the sides. It will also cause any can of soda or similar item to explode (don’t put drinks in your coolers in any event). When we used dry ice, we only used around 10 lbs of it.
If using dry ice, make sure the drain hole of the cooler is open to allow the dry ice to vent as it evaporates.
Insert refrigerator thermometers (see below) in both coolers, with the probe sensor near the top of the cooler, ideally in an air pocket if one exists. You want to measure the air temp of the cooler, rather than the temp of the ice. But even if you have a probe against the ice near the top, you should get an accurate idea of the cooler temperature. You will note that the cooler will stay exactly at 32 degrees (assuming you haven’t just opened it) until most of the ice in the cooler has melted. If using dry ice, you will note your cooler will be significantly below 32 degrees for a period (usually 12 to 24 hours), while the dry ice is doing its thing, and then rise to 32 degrees when the dry ice is gone and standard ice remains.
Close both coolers and tape them shut using duct tape or the like. For the second half cooler, go pretty heavy on the tape - maybe three full circles - to ensure a wide and fully sealed seam. The first half cooler can get by with a single pass if it looks like it’s doing the job.
Load your coolers, wrapped in blankets. Make sure for the 2nd half cooler you either have a small bowl or a towel in place below the open drain hole. A small amount of condensation will leak out over time.
Make sure you store your coolers during the trip in a colder part of your RV.
For the RV fridge, we make sure the fridge and freezer are cold before any food goes into them. Load a bag of ice in each before you start will get them cold. We put in the food for our first few days in the fridge and freezer (with anything going in the freezer being fully frozen before it’s put in). We also add two of our frozen one gallon zip lock bags in there to swap with melting bags in our coolers. The frozen food keeps the fridge cold during the drive, minimizing propane use, and will be defrosted by the time we are ready to eat our first meal on the playa.
A note about ice in coolers. People put way too much food and too little ice in coolers. Coleman recommends using 43.5 lbs. for their 58 qt coolers. 1 lb of ice is approximately 0.875 qt, so this equates to 38 qt of ice for a 58 qt cooler or 65% ice by volume. Because off of your food will be frozen when you put it in the cooler, you will find that using significantly less ice will still work well. The more of your food that basically looks like ice, such as frozen curries and soup, the less actual ice you will need.
A note about fridge thermometers. We always use fridge thermometer like this one in the cooler. This allows us to see the temperature of the cooler without opening it, and has an alarm if the temp rises above a safe level. Trust us on this one…. this is money well spent and absolutely critical for your second half of the week cooler, which won’t be opened until later in the week. An undetected problem there, and half your food is bad when you open it for the first time. Your food should always be below 40F, however, when you open your active cooler, you’ll see it may take 30 minutes or so for the air temp at the top of the cooler to drop down after opening. So long as there is still ice on top of the food, you should be ok, but you need to buy more ice if much all the ice has melted, even if the cooler temp is below 40F.
A note about taping coolers. Taping and blanketing coolers makes a measurable difference at room temp, and a very significant difference in hotter temperatures. If you are using dry ice, it’s critical that you open the drain plug to allow the expanding gas from the dry ice to escape. Otherwise, this type of explosion might happen. Put a little cup or a towel under the drain plug once you camp to make sure you get any condensation that might drip out. But if you’ve done a good job bagging your ice, you will get only a tiny amount of water coming out. Note, once the dry ice is gone, you can close the drain plug. You’ll be able to detect this without opening the cooler. When you first pack the cooler, the temperature will be well below freezing. We typically get a temperature of around 0 F for around 36-48 hours after we pack the cooler, and then the temperature rises as the dry ice has evaporated. Note, we use a small amount of dry ice given the cost - around 10 lbs - if you are using more it may well last longer.
Using the RV freezer. We also put a few frozen ziplock ice bags in our freezer. Each morning when we pull food out of our active cooler, we will switch a few melting bags for the freshly frozen bags in our freezer. The freezer doesn’t always keep up with the rate of melting in our cooler, and that’s fine. We only need the first cooler to stay frozen until mid week, and it always does. The second cooler is usually still close to fully frozen by the time we open it mid-week. Properly executed, you’ll be surprised at how much ice you still have on the last day. But worse case, you can always buy some ice at Camp Arctica if your ice strategy is falling short.
A Note About “Sorting” Food and Cross-Contamination. Some passionately insist that you should sort your food by type in different coolers: protein in one cooler, other stuff in another, etc. We believe the most important thing is to ensure your food remains frozen, and well contained in their respective zip lock bags. We would always opt for a first half/second half cooler strategy over coolers sorted by food type as we do everything we can to ensure all food is always at a safe temperature. Double bagged frozen food doesn’t leak. Therefore, cross-contamination in the cooler isn’t any bigger of an issue than it is in one’s refrigerator. Having all the ice bagged results in no water in the cooler, further reducing cross contamination risk.
Cold But Not Frozen Food. No such thing when it comes to our coolers. Our techniques require all food to be frozen when it goes in the cooler. The good news is lots of foods that aren’t normally frozen taste great frozen. If in doubt, try to freeze the food at home and see how it tastes cold and/or how well it heats up. Everything on our shopping list that needs to be cold can be frozen. You do have your RV fridge for cold items, so pack your salads and the like in the fridge and eat it in the first few days of your burn.
Food Handling: Unfreezing Food
We start our trip by putting our first two days of frozen meals in the RV fridge to defrost. This keeps the RV fridge cold without using much LP or electricity and by the time we finish our 12 hour drive and get in line, we are ready for our first meal. We continue throughout the week to pull out food once a day out of our active cooler and throw it in the RV fridge. Note, if you don’t have a fridge, consider bringing a third small cooler that can be used for defrosting purposes, and be sure to use a temperature gauge to maintain a safe food temp (below 40F).
When we are ready to eat, we’ll use either the microwave or a pot to heat up the food. If using the microwave we always remove the outer layer zip lock bag carefully before opening the inner bag — this keeps cross contamination to an absolute minimum. Always be sure to wash your hands well before doing food prep, and as an extra safety precaution, throw on some latex gloves or use a lot of hand sanitizer. Let’s face it, if you are conserving water, you aren’t getting your hands as clean as they should be for food prep.
An Alternative Cooler Strategy
In our early days we used a different cooler strategy, primarily because it sounded cool. Over the years we have abandoned this, but others swear by it (especially tent campers), so here it is.
You still need two coolers, but all your food will go into one of them, along with frozen water bags. The second cooler will be packed with a lot of dry ice (we would do around 50 lbs, plus bags of frozen water (ziplock freezer bags). Every day in the morning you will pull out the now melting freezer bags from your food cooler and put them in the dry ice cooler to refreeze, while pulling the frozen bags out of the dry ice cooler and putting them in the food cooler. Repeat every day.
This strategy works well, however, you have to open both coolers every day, losing a fair amount of efficiency in the process. In contrast, our current strategy only has one cooler opening every day, and in practice has resulted in us always having frozen food on the last day.
A Note About Tent Camping
Having done a lot of tent camping, here are three thoughts for your consideration:
Keep coolers in the shade, elevated off the ground, and wrapped heavily in blankets. This is your best defense against hot years ruining your food. Use a reflective blanket draped over the coolers for some additional protection. Read here for a frothy discussion on blanket use.
Buy ice early, as soon as there is room in the cooler for it. The lines to get it will be shorter, and your food supply will be safer.
Make sure to test cooking methods at home. Confession… I bring a microwave. It’s easy, reduces clean up and if you have room and a good generator, just buy one for $15 off Craigslist. It probably won’t replace your gas stove, but it will go a long way.
More Resources
ePlaya post with good cooler/food advice.
Google Doc with excellent cooler info/advice